

When most of us learned to knit, we started out with simple patterns and shapes. But not all knitting is a square or a rectangle and we eventually choose a pattern that need shaping, like a shawl, the toe of a toe up sock, top down reglan-style sweater or a Musselburgh Hat. Knitting increases are used to add stitches to shape a garment, add width to the fabric, or as a decorative feature. There are several methods to add stitches to knitting, some are visible design elements, while others blend into the fabric and are nearly invisible. Pattern designers will usually specify which increase to use but understanding how and when different methods are used can help you choose the right technique if you are designing or altering a pattern, or if the designer has not indicated which increase to use.
Knitting increases create specific shapes or achieves a particular design feature. Increases can be placed at the beginning, the end or within the row. There are four ways increases are used.
How Increases are Used in Patterns
1. Paired Increases - Paired or mirrored increases are used to create a balanced, symmetrical shape. Two increases can be worked close together with one or two stitches between them, or worked near the beginning or end of a row. Triangular shawls are shaped with paired increases at the center spine. Top down, reglan sweaters use four sets of paired increases to create shoulders and sleeves.


2. Stacked Increases - Stacked increases are worked in the same location every row/round or every other row/round, forming a visible line of increases. Different types of increases can be used in this way to create an intended shape and add a decorative design feature. Stacked increases are often also paired increases.

3. Evenly spaced Increases - In some patterns, the designer will instruct you to increase X-number of stitches evenly across a row/round, adding stitches without changing the overall shape of the garment. This is done when a section of the pattern requires more stitches, such as increasing the circumference of a sweater body or sleeve.
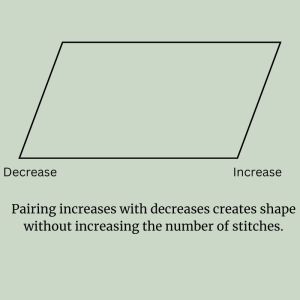
4. Increases Paired with Decreases – An increase can also be paired with a decrease to change the direction or shape of your fabric while keeping the total number of stiches the same. For example, a pattern may place an increase near the beginning of the row and a decrease near the end of the same row, resulting in a slanted or diagonal shape.
How The New Stitch Is Made
There are many different knitting increases, but they generally fall into three categories based on how the new stitch(es) are created.
1. Increases worked into an existing stitch. An often-used increase in this category is Knit Front and Back (kfb), where the stitch is knit through the front loop, then, without dropping that stitch off the needle, the same stitch is knit through the back loop, then it is dropped off the needle.
Pattern instructions: K1, KFB, knit to end of row

2. Increases worked between stitches. Included in this category are: Make One and Lifted Increase. Make one forms the new stitch using the horizontal strand between two stitches. A lifted increase uses the stitch in a row below to create a new stitch. Both have right leaning and left leaning techniques that indicate the direction the increase lays, it visually slants right or left after it is created. The pattern may indicate M1L (Make 1 Left) or M1R (Make 1 Right); LLI (Left Lifted Increase) or RLI (Right Lifted Increase). The slant of the new stitches made with M1L and M1R can be seen in this image.
Pattern Instructions: Knit to M, M1R, Sl M, Knit 1, Sl M, M1L, knit to end of row

3. Increases that add a new stitch. This increase includes Yarn Over (yo) and Cast On (co) stitches. Yarn over between two stitches creates a small hole or eyelet in the knitting. This increase is commonly used in lace patterns but can also be used for shaping and the eyelet becomes a design element. The image shows the decorative nature of the yarn over increase.
Pattern Instructions: K1, yo, knit to end of row.

Casting on stitches at the beginning or end of a row extends the knitted fabric. This technique can be used to add stitches to the underarm of a sweater.
Pattern Instructions: Cast on 5 stitches at the beginning of the next row.

Now that we understand why increases are used and how they appear in knitting patterns, Part 2 will look at how to make that new stitch and variations of common knitting increases.


